About the ScenarioSwitcher Add-In
| Current Version: | 1.0.0 |
| Release Date: | April 1, 2024 |
| Downloadable Here: | ScenarioSwitcher.xlam |
The ScenarioSwitcher Add-In for Excel is:
- designed to make it easy to switch which scenario is active in a complex model without the need to add code to the model or drop-down lists or slicers, and to avoid the need to navigate to a specific page to utilise a built-in control.
- for use on desktop copies of Excel and does not work with the web app versions. It is compatible with all versions of Excel since 2007.
- a free to use add-in released by Clarkson ITT for use by students and members. It is distributed under a Creative Commons CC-BY-ND 4.0 Licence, so may be freely copied and provided to other users who wish to utilise it in models you have designed to work with it.
- Copyright © 2024, Clarkson ITT Pty Limited
ScenarioSwitcher Controls
When the add-in is loaded, it adds a button group is added to the Review tab in Excel, and it looks like this:
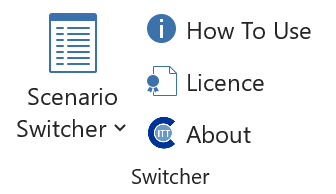 |
The controls provided are: | |
| Scenario Switcher | An automatically populated menu that lists the scenario names in the range referred to by the defined name ScenarioNames. Only enabled when the active workbook contains the two required name definitions - ScenarioNames and SwitcherSelection. | |
| How To Use | A link to this article which includes the how to install and how to setup instructions. Always enabled. | |
| Licence | A dialog box that displays the licence information and links to the Creative Commons licence deed under which the add-in is released. Always enabled. | |
| About | A dialog box that displays the about information for the installed add-in. Always enabled. | |
How It Works
When a workbook is opened or activated (i.e. when you switch between workbooks) the add-in quickly checks to see if the active workbook is setup to use the switcher control. It will conclude that it is if there are two defined names present in the workbook. If neither is present, or only one of them, the Scenario Switcher control in the Switcher group is disabled. The two names it is looking for are specifically:
ScenarioNames - a defined name that refers to the range that contains the list of scenario names. May be either a horizontal or a vertical list. If the defined name has more than one area, only the first area is used by the add-in. It is hard to see how a multi-area name for scenarios would be useful.
SwitcherSelection - a defined name that refers to the range in which the Switcher will store the number representing the selected scenario. It would be just as easy to have the Switcher store the name of the scenario, but this mechanism was chosen for compatibility with drop-down control implementations.
If the user clicks the Scenario Switcher menu contol, the menu is populated with the non-blank entries from the range referenced by the defined name ScenarioNames. If the value in the range referenced by the defined name SwitcherSelection relates to one of these options, it will be shown as ticked.
If the user then clicks one of the options displayed in the menu, the number associated with that options is placed in the cell referenced by the defined name SwitcherSelection, thus enabling the formulas in the model to update the results based on the changed scenario selection.
How to Setup a Workbook to Use the ScenarioSwitcher
In a model that you wish to use with the ScenarioSwitcher, there need to be two defined names created. The first is ScenarioNames and it needs to refer to the list of scenario names in the model. This list can be either horizontal or vertical in layout, and can be a specially prepared list or it may be a direct reference to the cells naming the various scenarios.
The second defined name that must be created is SwitcherSelection. This may be an extra name applied to a cell that is already named, but it should be a cell that id not derived by formula and that the ScenarioSwitcher can update. The value it assigns to the cell is the number of the selection numbering from 1 representing the first scenario listed in ScenarioNames through to the number representing the last non-blank entry in ScenarioNames. Suppose the range named as ScenarioNames refers to the cells E3:H3. If cell E3 contains "Base Case", F3 contains "Plant Expansion" and G3 contains "Revised EBA", then the menu displayed would contain three entries, and the value assigned to SwitcherSelection would be the value 1 if the user clicked on Base Case, 2 if they clicked on Plant Expansion and 3 if they selected Revied EBA.
To make use of this result, the formulas in the model should then lookup the values appropriate to the selected case.
How to Install ScenarioSwitcher
Download the add-in from the link given above. Store it in a suitable location, we recommend having an Add-Ins folder either on your C: Drive or better still on your OneDrive, so it is always accessible when you are logged-in, even on a different PC. Note that the folder in which you store it will need to be ina trusted location, or the sub-folder of a trusted location that also trusts sub folders, otherwise Excel will not open an Excel Add-In in xlam format that was downloaded from the web.
Open Excel.
- If you have the Developer tab enabled in Excel, select Developer » Excel Add-Ins from the ribbon.
- If you do not have the Developer tab enabled, select File » Options from the ribbon.
In the Options dialog box, click on Add-ins.
In the Add-ins tab of the Options dialog box, at the bottom, select Excel Add-ins in the Manage drop-down and click Go... button.
In the Add-ins dialog box, click the Browse... button and in the Browse dialog (looks like normal Open dialog), browse to where you stored the add-in file, select it and click OK.
You should now see the add-in listed in the add-ins and it is loaded and active.
How to Unload ScenarioSwitcher
Unloading stops the add-in from operating, but leaves it installed.
Open Excel.
- If you have the Developer tab enabled in Excel, select Developer » Excel Add-Ins from the ribbon.
- If you do not have the Developer tab enabled, select File » Options from the ribbon.
In the Options dialog box, click on Add-ins.
In the Add-ins tab of the Options dialog box, at the bottom, select Excel Add-ins in the Manage drop-down and click Go... button.
In the Add-ins dialog box, uncheck the checkbox next to Scenarioswitcher entry in the list of add-ins. Click OK.
The add-in is now unloaded and will not operate until you repeat the above process, checking the checkbox next to the Scenarioswitcher entry.
How to Permanently Uninstall ScenarioSwitcher
While Excel is not open, using your file browser, browse to the location where the add-in is stored. Either delete the add-in file, or rename it.
Open Excel. You will receive a warning about the missing add-in.
- If you have the Developer tab enabled in Excel, select Developer » Excel Add-Ins from the ribbon.
- If you do not have the Developer tab enabled, select File » Options from the ribbon.
In the Options dialog box, click on Add-ins.
In the Add-ins tab of the Options dialog box, at the bottom, select Excel Add-ins in the Manage drop-down and click Go... button.
In the Add-ins dialog box, click on the Scenarioswitcher item in the add-in list. Excel will display a message saying the add-in is not found and offering you the option to remove it from the list. Repond by clicking Yes.
The add-in is now uninstalled. You can reinstall it a gain later by following the process described above for installation.